Amish made hardwood

It is currently Mon Nov 25, 2024 12:37 am

All times are UTC - 5 hours


Post new topic Reply to topic  [ 4 posts ] 
Author Message
 Post subject: Prep going good, but a few questions
PostPosted: Sun Jan 20, 2008 3:32 pm 
Offline
New User

Joined: Wed Jan 16, 2008 6:01 pm
Posts: 2
Hi,

I wanna thank all on this forum for making it one of the best resoures online. I have spent hours reading and searching. Thanks and kudos for all who have spent the time to contribute.

I am now getting close to install. Floor prep has been going well with the exception of trying to live around this. I have a few questions that i would appreciate if someone could help.

I will be installing 3/4 x 31/4 ash. Floor has been downstairs for 4 weeks then moved it upstairs 3 weeks ago. 2nd floor install, 14 y.o 5/8 plywood floor that appears to have been nailed and glued.
-reset all nails and filled most all knot holes and will be cleaning up plywood edges next week to improve floor smoothness. Will be using 15# roof paper. Next week i will be borrowing a moisture meter to monitor final readiness. house temp is 60 - 70deg and rel hum is 40-50%.
mile or two north of the 49th, couple hours north of Seattle.

my questions:

1) my wife wants to replace carpet on stairs, so my project will begin at the stairs with only top stair nosing. (likely will start here as well, then reverse direction as required)

From topics i have read it seems that i will want to spend extra time to get this top nosing done correct, and it should be glued down with PL400 and should also be flush on ends with my wall. If I am installing new baseboards all around do I continue the baseboard to include the stair nosing, or use stainmatched 1/4 round, or my guess is to only have the stair nosing piece fit tight between walls.

Also the top riser is flush to the top floor. Is the 1" nosing overhang going to be sufficient to cover the carpet or should I add 1/4"-1/2" strip before installing the nosing?
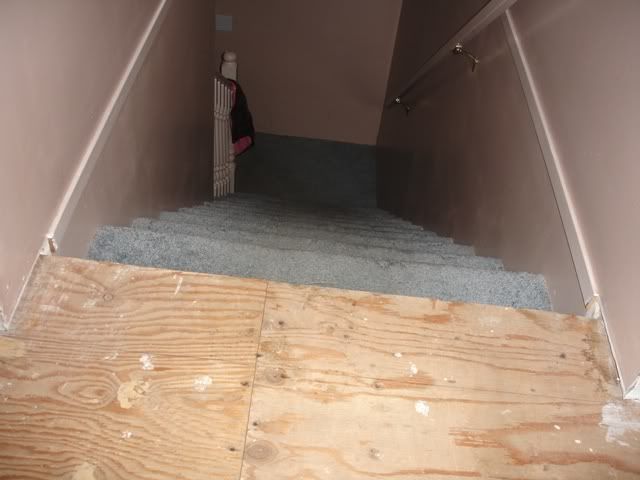
Image

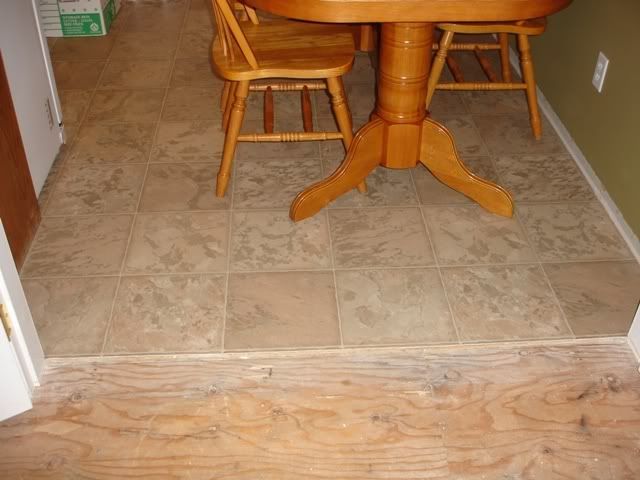
2) we have installed new vinyl floor in kitchen. 1/4"height diff, vinyl is lower. Where my new hardwood meets, I will be wrapping the baseboard around this doorway into the kitchen. (there was nothing in this doorway before as baseboard was only in hallway, but I think it will look better to wrap it around)
I would install the baseboard first, then come back later to install the t-molding?
Image

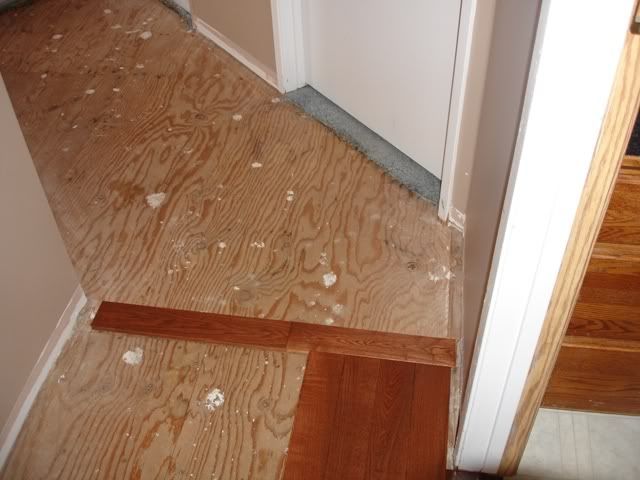
3)In this doorway I wont be carrying baseboard around thru, so am I correct that I will undercut the door jam only far enough to install the wood floor plus 1/2"expansion, then use the t-molding cut to fit tight between the doorway casing and overtop the two floors
Image

4)My hallway has a turn. I am thinking it will be easier to square off across the hall with a header piece, and then I will only need to mitre pieces on one side. This seems easier to me and I am unsure how this would look. I would be lined up with one corner as the hallway turns. Or should I position the header so it is positioned to match both hall angles and mitre both sides.
How would you do this?
Image

thanks in advance


Top
 Profile  
 
Amish made hardwood

 Post subject:
PostPosted: Tue Jan 22, 2008 4:22 am 
Offline
Worthy Contributor

Joined: Wed Nov 07, 2007 1:32 am
Posts: 299
Location: Yakima, WA
1 I would not use your stair-nosing to begin your lay. I would find your longest focal point and use this as a reference. If you use you stairs as the point you square off from. You will find most undoubtably that you will be out of square. Remember, no home is built square, but that is no excuse. The trick is to hide that fact. Also you stair nosing lip should be adequate to cover the carpet on the riser if I understand your question. But when I try and fit my stair-nosing to my floor I will shoot for overhanging 1/4".

2. Yes baseboard then T-moulding, or use your material to fabricate a flush transition that will lay on top of your vinyl floor. If you want help with how to do this let me know.

3. Yes, or fab you own again. It is really not too difficult. If you have the tools. Router, table saw

4. I think if you were to turn the lay in the hall you have chosen the spot that makes the most sense. Though I think rather than turning the lay at that point I would be inclined to continue the straight lay through the bend in the hall.

BTW - How long have you lived in B-ham?

_________________
Witty saying goes here.


Top
 Profile E-mail  
 
 Post subject:
PostPosted: Tue Jan 22, 2008 5:28 pm 
Offline
New User

Joined: Wed Jan 16, 2008 6:01 pm
Posts: 2
Thanks for the reply Barquios

Actually I am not in Bellingham I am a couple miles north of Sumas in Chilliwack, BC, you are pretty close to me.

The reason I was going to start at stair is twofold, 1) It will be the first piece I see everyday and it would bug me I think if I end at stair and have to rip a small piece to match up to it. 2) I took a line with my square off the wall and made a control line down the hall and into dining room. The control line seemed to be pretty square to the stair and my dining room wall. I was going to glue my nosing, wait till it dries good then work out and work both left and right off the stair.

My sketch isn't very good but will give you an idea. Where would you suggest to start.
Image

Image

Originally I was going to go straight down the hall and continue on the same pattern, but I thought it would create more work at the three bedrooms. Hence I thought if I changed direction once, then the doorways should be easier to manage as I would be square to them. If I stay with same direction won't that create even more mitres for me?
Image

sorry for all the photos but it makes explaining easier

I recieved a table saw for Christmas and I have a chop saw, but no router


Top
 Profile  
 
 Post subject:
PostPosted: Wed Jan 23, 2008 5:02 am 
Offline
Worthy Contributor

Joined: Wed Nov 07, 2007 1:32 am
Posts: 299
Location: Yakima, WA
You are using a pre-finished product I assume. It makes sense to avoid the small strip in front of the stair nose. I would measure back from where you want your stair nosing to fit. Measure back enough board widths so that you will get a clear shot that will run the length of the hall and into the living room. then this line can be squared to match the walls in the hall and living room.

Yeah, if you don't turn your lay in the hall you will have more mitre cuts. I think you plan for the header in the hall is a sound one.

_________________
Witty saying goes here.


Top
 Profile E-mail  
 
Post new topic Reply to topic  [ 4 posts ] 

All times are UTC - 5 hours


Who is online

Users browsing this forum: No registered users and 0 guests


You cannot post new topics in this forum
You cannot reply to topics in this forum
You cannot edit your posts in this forum
You cannot delete your posts in this forum

Search for:
Jump to:  
Powered by phpBB © 2000, 2002, 2005, 2007 phpBB Group

phpBB SEO