Amish made hardwood

It is currently Thu Jan 09, 2025 11:08 pm

All times are UTC - 5 hours


Post new topic Reply to topic  [ 10 posts ] 
Author Message
 Post subject: Noob Install: Looking for Advice (Floorplan Included)
PostPosted: Fri Sep 05, 2008 11:34 am 
Offline
New User

Joined: Fri Sep 05, 2008 11:22 am
Posts: 5
Hi Everyone,

First of all, you have a great thing going here! I've spent numerous hours here so far just reading through old threads and whatnot and have learned a tremendous amount already!

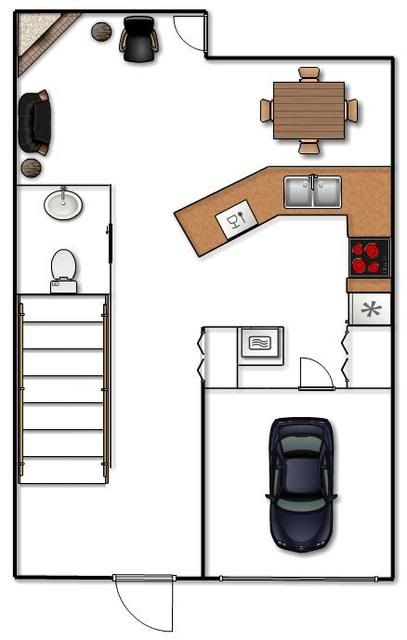
I'm going to be attempting an install of prefinished maple on the main floor of my townhouse. Below is a rendering of the layout (not to scale).

My first question (likely of many to come) is where should my first row be? I read that it should be on the longest exterior wall possible, so I'm thinking the very top wall next to the corner fireplace, and work my way towards the front door (at the bottom of the image). Hopefully I can get it straight, but I don't really know how to make sure it's square - ie, there's no opposing wall that I can measure from. Should I just measure out from that wall the width of the board plus my expansion gap and off I go?

Any suggestions?

Thanks!

Brad
Image


Top
 Profile  
 
Amish made hardwood

 Post subject:
PostPosted: Fri Sep 05, 2008 12:27 pm 
Offline
Worthy Contributor

Joined: Thu Jul 24, 2008 3:57 pm
Posts: 198
Location: New Jersey
I see two outside walls where the DR table is .. chalk a line the width of the board + 3/4 " for expansion .. from the point of where the two lines meet in the corner top right , measure down and mark one at 3' and the other line at 4' .. Take a measurement from mark to mark , if you are laying square it should measure 5' .. Adjust the line if it is not .. I would transfer that line all the way across the room towards the fire place .. If those are steps i see behind the powder room , take a measurement from the line going across the width of the house down the hall and make sure you will have a full board meeting up with the new stair nose .. Chalk another line from the line going across the width of the house down the hall that will give you a full board .. That is your starting line .. Ken probably has pictures on here somewhere .. :)


Top
 Profile  
 
 Post subject:
PostPosted: Fri Sep 05, 2008 2:41 pm 
Offline
New User

Joined: Fri Sep 05, 2008 11:22 am
Posts: 5
Thanks very much for the reply, Nick however I'm not completely understanding your advice.

If I were to measure out from the top wall near my table, the width of the board plus expansion would be 3". Chaulk one line there, and then another 3' out and again at 4' - how would that equal 5'? Also, I don't see how that would tell me if I'm square or not... sorry, I know I'm not understanding you correctly.

Would you be so kind as to explain again?

Thanks!


Top
 Profile  
 
 Post subject:
PostPosted: Fri Sep 05, 2008 9:05 pm 
Offline
Semi Newbie Contributor

Joined: Sun Aug 31, 2008 1:05 pm
Posts: 61
Hi Brad,

I am certainly not a hardwood flooring expert but may be able to help.

Without going into a lot math, the lengths of the 3 sides of a Right Triangle (a triangle where one of the angles is 90 degrees) will have certain proportions to each other. One particular case, is a right triangle whose 2 perpendicular sides have lengths of 3' and 4'. The 3rd side (the diagonal side or hypotenuse) of this particular right triangle will have a length of 5'.

I think Nick is suggesting that you construct a chalk line triangle in the upper right corner of your drawing by snapping two lines 3" from the two walls forming the corner there. One extending to the left from the corner and the other extending down from the corner. Then from the point where the two chalk lines intersect, measure 3' on one line and make a mark. Next, again from the intersection of your two chalk lines measure 4' on the other chalk line and make a mark there.

What you are doing here is creating 2 sides of what you hope will be the two perpendicular sides of a 3-4-5 right triangle. If your two chalk lines are truly at 90 degrees to each other, the distance between your two marks should be exactly 5'.

I hope this helps! ZT


Top
 Profile  
 
 Post subject:
PostPosted: Fri Sep 05, 2008 10:35 pm 
Offline
New User

Joined: Fri Sep 05, 2008 11:22 am
Posts: 5
ZT, that makes complete sense. I didn't think I'd need to use Pythagorean theorem in laying hardwood... LOL!

Thanks for the clarification, and Nick, your instructions were great - that's what I'll do.

Stay tuned to this thread for future questions!! Ha!


Top
 Profile  
 
 Post subject:
PostPosted: Sat Sep 06, 2008 11:16 am 
Offline
Semi Newbie Contributor

Joined: Sun Aug 31, 2008 1:05 pm
Posts: 61
Follow up question on squaring up using the 3-4-5 triangle?

If the two walls forming the corner near Brad's dining room table are truly perpendicular AND straight, and the chalk lines are snapped accurately 3" form each wall, then the distance between the 3' and 4' marks WILL be exactly 5'.

If the two marks are not exactly 5' apart, how does one know which wall, and resulting chalk line, is out of square and should be adjusted to be sure the layout is square in the room?


Top
 Profile  
 
 Post subject:
PostPosted: Sat Sep 06, 2008 11:55 am 
Offline
Site Admin
User avatar

Joined: Wed Aug 04, 2004 10:08 pm
Posts: 1732
Location: Bonita Springs, Florida
Quote:
Ken probably has pictures on here somewhere ..


No good action shots just illustrations I put together. I make sense from it but from another persons perspective, perhaps not. I've been meaning to get to any job to get more pics. May have a 3,4,5" random width job to see in early October from the guys at True Hardwoods.com.

In the meantime try the link below...


Control Lines Installing Hardwood Floors

By the way. Can you run the flooring the other way? Running paralell to the stairs would look better in my opinion.

And, great sketch! I wish could grasp photoshop:(


Top
 Profile E-mail  
 
 Post subject:
PostPosted: Sat Sep 06, 2008 1:31 pm 
Offline
Worthy Contributor

Joined: Thu Jul 24, 2008 3:57 pm
Posts: 198
Location: New Jersey
Thought that was the way BAreEhD was running it .. thus the reason to take a measurement from the line from the table to the couch down to the stair nose to make sure he has a full board ..
One note : i would cut the nose off the existing stair nose first , slide the new one in temporary and take the measurement from that .. You can then adjust the line in the LR , chalk a new line to start from so you have a full board at the nose .. Did a Inspection a few weeks back , LR Dr with steps going down in DR .. These Pros had a 1/4 " strip at the stair nose .. First thing that caught my eye ..


Top
 Profile  
 
 Post subject:
PostPosted: Mon Sep 08, 2008 1:58 am 
Offline
Worthy Contributor

Joined: Wed Nov 07, 2007 1:32 am
Posts: 299
Location: Yakima, WA
Quote:
If the two marks are not exactly 5' apart, how does one know which wall, and resulting chalk line, is out of square and should be adjusted to be sure the layout is square in the room?

BAreEhD


Looking at the control lines you have created you can then adjust the one that will have the less impact upon the focal points of the layout. Or you could choose to adjust both of them splitting the difference so as to have the least impact.

_________________
Witty saying goes here.


Top
 Profile E-mail  
 
 Post subject:
PostPosted: Thu Sep 11, 2008 7:03 pm 
Offline
New User

Joined: Thu Sep 11, 2008 6:55 pm
Posts: 1
Are you gluing or nailing? If nailing you should run parallel to the joists in most cases.


Top
 Profile  
 
Post new topic Reply to topic  [ 10 posts ] 

All times are UTC - 5 hours


Who is online

Users browsing this forum: No registered users and 0 guests


You cannot post new topics in this forum
You cannot reply to topics in this forum
You cannot edit your posts in this forum
You cannot delete your posts in this forum

Search for:
Jump to:  
Powered by phpBB © 2000, 2002, 2005, 2007 phpBB Group

phpBB SEO